A popular pattern in use with cloud native technologies is the ‘Request Reply’ pattern. I tried to come up with an abstract example, that can easily be understood and tested. All source code can be found in this GitHub repo, the current release is here.
What is the Request Reply Pattern
The idea of this pattern is to provide the backend with asynchronicity while the frontend receives regular replies. It is also useful, when you do not control the client or are not able to influence the call strategy of the client. It is cheap to implement on the client side for example blocking with polling, and it does not require callbacks or websockets, which makes it attractive also for the slow running world of synchronous enterprises and big corporations.
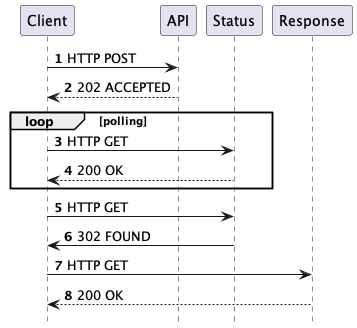
HTTP Flow
In its simplest form and from client perspective the pattern can look like this:
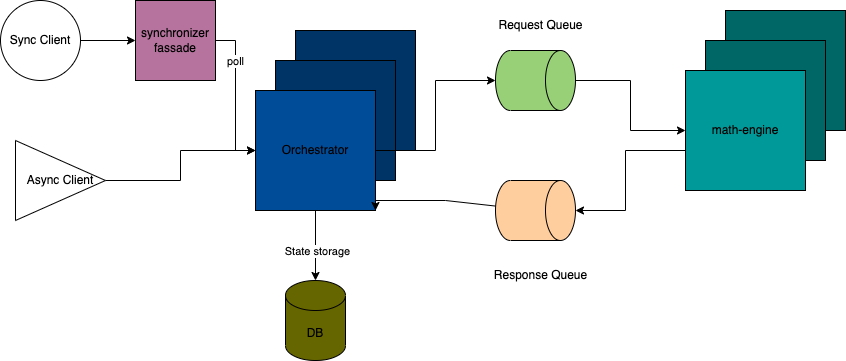
Highlevel Component Diagram
The simplified component architecture looks like this:

Important to mention here is that the original request is persisted as a state in the first APIs data store. This may be a relational database but can also be something like a Redis cache where you are able to store data with an associated time to live.
To make everything work as expected we need to give each request an ID. This is needed so the response can be associated with an existing request state. Especially when there are many nodes of the API available.
Distributed Calculator
I created an example stack that when deployed together simulates a rudimentary distributed calculator.
What is in the package?
You can find the binaries as container images on hub.docker.com There are exactly three of them, the synchronizer facade is optional and purely to show how to deal with old existing clients or clients we do not control. It gives us an opportunity to deploy a new fast and scalable backend while maintaining backward compatibility.
Binaries
Kubernetes Deployment Files
Note:
Just for the fun of it I used a HSQL DB. I can see that I will change this in the
future to mysql as I would like to run it in an EKS cluster against an Aurora
Serverless v2 with mysql flavour.
If you are running this on a Kubernetes Cluster in AWS you may choose not to deploy ActiveMQ inside your cluster, but to rely on the AMQ flavour as well.
For now, I am assuming that you are running everything inside your cluster. The fastest way to deploy everything, is to run:
kubectl apply \
-f https://github.com/TomSchalld/messaging-patterns/releases/download/RELEASE_ASYNC_REQUEST_REPLY_1.0.0/activemq.yaml \
-f https://github.com/TomSchalld/messaging-patterns/releases/download/RELEASE_ASYNC_REQUEST_REPLY_1.0.0/hsqldb.yaml \
-f https://github.com/TomSchalld/messaging-patterns/releases/download/RELEASE_ASYNC_REQUEST_REPLY_1.0.0/math.yaml \
-f https://github.com/TomSchalld/messaging-patterns/releases/download/RELEASE_ASYNC_REQUEST_REPLY_1.0.0/orchestrator.yaml
Usage
The Kubernetes files are preconfigured so that everything should work out of the box. The service definition is set to deploy a load balancer for the math orchestrator. If you would like to keep it a bit more private, I would recommend to use port forward to the orchestrator pod instead. Obviously you can not do this if you want it to do autoscaling.
For now my assumption is that you are using port forwarding from port 8080 on your localhost to the target pod.
We can push a simple set of test data against our api using curl
- Let’s try to add 30 and 12
 curl --request POST -sLvvv \
     --url 'http://localhost:8080/input'\
     --header 'Content-Type: application/json' \
     -d '{"action": "ADD", "left": 30, "right":12}'
The server will take the request and push it into the queue for processing. The response as described in the #HTTP FLow Diagram should look like this:
HTTP 202 Accepted
Location: http://localhost:8080/status/{UUID}
Retry-After: 3000
- We can now start to poll the status endpoint to see if our process has been already finalized.
 curl --request GET -sLvvv \
     --url 'http://localhost:8080/status/{UUID}'
During the polling the status endpoint will answer with the following
HTTP 200 OK
Location: http://localhost:8080/status/{UUID}
Retry-After: 3000
Once the request has been processed, the status endpoint will issue code 302 and redirect to the Result Endpoint.
If the result endpoint were queried before the response data is available, it will answer with a 404.
Implementation
The complete flow implemented, can be seen here:

There is no particular difficulty in implementing this pattern with the help of Spring boot and their JmsTemplate.
See below example of a simple way of sending an Object Message, with the JmsTemplate:
@Component
public class MessageDispatcherImpl implements MessageDispatcher {

    private static final Logger LOGGER = LoggerFactory.getLogger(MessageDispatcherImpl.class);

    @Autowired
    private JmsTemplate jmsTemplate;

    @Override
    public void send(Calculation calculation) {
        final String destination = calculation.getAction().getQueueDestination();
        LOGGER.info("Sending message to {}, with value {}", destination, calculation);
        jmsTemplate.convertAndSend(destination, calculation);
    }


}
And a simple sending receiver on the other side:
@Service
public class AddReceiver implements MessageReceiver {

    private static final Logger LOGGER = LoggerFactory.getLogger(AddReceiver.class);

    @Autowired
    private JmsTemplate jmsTemplate;

    @Value("${orchestrator.reply.queue}")
    private String replyQueue;

    @JmsListener(destination = "${orchestrator.add.queue}")
    @Override
    public void receive(CalculationRequest request) {
        LOGGER.info("Received calculation request: {}",request);
        final int result = request.getAction().calculate(request.getLeft(), request.getRight());
        jmsTemplate.convertAndSend(replyQueue, new CalculationResult(result, request.getCorrelationID()));
        LOGGER.info("Answer send ");
    }
}
The only real caveat I encountered is the tight coupling between sender and receiver objects. One of the data fields that is transferred as part of the message is the _type field. This describes the FQCN of the sender Object, and it is what is expected on the other side. This is not a problem, if both applications are sharing a common messaging API. IT is however a problem if you are trying to decouple your applications as much as possible.
Spring gives us the option to define a custom mapping in our MessageConverter Bean.
@Bean
public MessageConverter jacksonJmsMessageConverter() {
    MappingJackson2MessageConverter converter = new MappingJackson2MessageConverter();
    converter.setTargetType(MessageType.TEXT);
    converter.setTypeIdPropertyName("_type");
    final Map<String, Class<?>> typeIDs = new HashMap<>();
    typeIDs.put("com.schalldach.data.Calculation", CalculationRequest.class);
    converter.setTypeIdMappings(typeIDs);
    return converter;
}
Conclusion
| + + Pros | - - Cons |
|---|---|
| Increases scalability, reliability, resiliency, performance | Costly to implement for existing services |
| Supported with out of the box tools in spring | Additional external service MQ needed |
| Extendable and stackable | Needs synchronizer facade for backward compatibility |
| Suitable in environments wehere WS are blocked | Error tracing and handling not immediately obvious |
Considerations
Personally I believe this is a highly useful pattern, which is fairly easy to implement correctly. Especially if you are designing a new system, solution or product. If you are dealing with cloud native functionality or trying to attempt cloud transformation, you should definetly spend a few minutes on it.
One aspect I like is that it is stackable. You could use it to daisy-chain architectures in a relatively safe manner. It can be handled easily in most clients, and it can be extended. You may for example choose to add message broadcasting for websocket clients instead of polling when your processing has finished.
Further references: